If you are asking can Gemini edit videos you recorded yourself, the answer is yes, once you separate Google’s generative clip model from its desktop agent workflow. Uploading an MP4 at gemini.google.com only lets Gemini redraw or extend a few seconds of video, whereas connecting Gemini 4 inside Google Antigravity to ChatCut Desktop lets Gemini cut real multi-take recordings on a local timeline, style word-level captions, build editable Motion Graphics, generate studio-matched B-roll, mix ducked music, and export a finished MP4 or Premiere Pro XML.
This test was run by Gemini 4 Carbon in the Antigravity CLI on macOS, using the ChatCut plugin. First, Gemini turned a 30.1-second dual-take studio talking-head recording (complete with filler words, a mid-sentence apology, and a verbal stumble) into a finished 15.8-second 1080p cut. Second, we ran Gemini Omni 1.1 Flash on a 5-second Mediterranean fashion shot to restyle an off-white linen trench coat into deep cobalt wool, testing a 360p preview (1.04 credits) before rendering the 1080p pass (3.88 credits). Every timeline cut, transcript pass, caption track, Motion Graphic, and local export used 0 ChatCut credits; all six optional cloud generations across the entire test totaled 11.07 ChatCut credits.
Can Gemini edit videos directly? Three tools behind one name
Most frustration around Gemini video editing comes from opening the wrong surface for the job. Google currently ships three distinct video workflows under the Gemini umbrella, and only one of them edits full-length footage on a multi-track timeline while preserving your original camera pixels:
| Workflow | Model / Engine | What it actually does | Practical length | Editable multi-track timeline? | Best for |
|---|---|---|---|---|---|
| Gemini App & Flow (gemini.google.com) or ChatCut Video Gen | Gemini Omni (Gemini Omni 1.1 Flash in ChatCut) | Redraws clothing, lighting, weather, or objects across a short clip, or extends the end of a shot | 3 to 10 seconds standard (up to 15 seconds on Google AI Ultra) | Not in Gemini App; yes when placed inside a ChatCut project | Restyling or extending a single B-roll shot without reshooting |
| Google Vids (workspace.google.com) | Workspace browser editor + Gemini Omni clip generation | Builds slide-style browser videos from Docs/Slides, trims webcam or screen recordings, inserts stock media | Up to 30 minutes | Scene-based browser timeline in Google Drive | Internal team updates, training decks, and Workspace summaries |
| Gemini 4 in Google Antigravity + ChatCut Desktop | Gemini 4 (Carbon or Argon) + ChatCut’s AI video editor | Cuts local recordings from word-timed transcripts, styles captions, writes Motion Graphics, generates B-roll, ducks audio, exports up to 4K | Full recordings on your Mac or Windows drive | Yes, full local multi-track timeline + XML handoff | YouTube videos, Shorts, creator talking-heads, product promos, and podcasts |
Two official boundaries are worth knowing before you upload camera files to Google’s web apps:
- Gemini App regenerates pixels rather than cutting a timeline. Per Google’s Gemini Omni announcement and Gemini Apps video documentation, uploading a clip to edit is capped at short durations, is unavailable in the European Economic Area, Switzerland, the United Kingdom, and some US states, blocks changes to spoken dialogue, and redraws the entire frame with an invisible SynthID watermark. If you only want to cut three filler words out of an interview, whole-frame regeneration is the wrong tool.
- Google Vids is built around slide scenes, not creator finishing. Based on Google’s official Workspace documentation and September 2026 Gemini Omni in Vids release (not tested live in this session), Google Vids supports up to 30-minute Drive timelines and free Gemini Omni clip inserts for workplace explainers, while lacking local disk editing, custom Remotion Motion Graphics, reference-matched B-roll workflows, and XML handoff to Premiere Pro or DaVinci Resolve.
For the rest of this guide, Steps 1 through 9 walk through full timeline editing with Gemini 4 in Antigravity + ChatCut Desktop, followed by a dedicated shot-restyling test with Gemini Omni 1.1 Flash so you can see where each model earns its keep.
Watch the finished cut Gemini edited from raw studio takes
Here is the 15.8-second 1080p (24 fps) master that Gemini 4 Carbon produced from our 30.1-second raw studio camera roll. Every cut, word-highlighted caption, punch-in zoom, animated title card, cutaway shot, music duck, and outro voiceover below was directed through prompts on an editable ChatCut Desktop timeline:
Quick start: edit a video with Gemini in five steps
- Connect ChatCut Desktop in Antigravity. Open Google Antigravity (App, IDE, or the
agyCLI) on macOS 13+ or Windows 10+ (x64) and sendRead ChatCut.io/antigravity to install ChatCut, sign in once, and open a new conversation. - Import your footage and read the transcript. Drop your camera files into Media Pool (or point Gemini at a local file) so ChatCut generates a word-timed transcript with exact pause durations.
- Lock the A-Roll rough cut first. Ask Gemini to drop weaker takes, restarts, filler words, and dead air, then listen back to verify every cut boundary before adding visuals.
- Layer captions and B-Roll. Add word-level captions, punch-in zooms to disguise jump cuts, custom Motion Graphics, reference-matched AI B-roll, and auto-ducked music one stage at a time.
- Review and export locally. Check the multi-track timeline in ChatCut Desktop, tweak any cut or text property by hand or by prompt, and export a 1080p/4K MP4 or Premiere/Resolve XML.
What you need before you start
- macOS 13+ or Windows 10+ (x64) with a graphical desktop. ChatCut Desktop keeps your source footage and renders timelines locally on your machine (ChatCut Desktop guide). Linux, containers, and headless SSH sessions are not supported.
- Google Antigravity with Gemini 4. You can run prompts from the Antigravity desktop app, the IDE panel, or the
agyterminal CLI (Antigravity documentation). Google is transitioning Gemini CLI users to Antigravity CLI, so start new setups in Antigravity rather than Gemini CLI. Your Google account and region must support Antigravity; if Antigravity reports “not currently available in your location,” stop there rather than attempting to bypass account or regional restrictions. (If you prefer another host agent, see our companion guides on editing video with Claude and editing video with ChatGPT.) - A ChatCut account. Sign in once when prompted. On ChatCut’s Free and paid plans, local timeline cuts, speech transcription, standard captions, Remotion Motion Graphics written by your external agent, audio ducking, and local MP4 or XML exports cost 0 ChatCut credits (Credits policy). ChatCut credits are billed only when you trigger hosted cloud media generation such as AI video (paid plan required), image thumbnails, generated music, or text-to-speech voiceovers, and Gemini checks the exact credit estimate before submitting a job.
- Real source footage and a clear deliverable. State the target platform, aspect ratio, approximate runtime, and what must stay untouched.
A-Roll first, then B-Roll: how to brief Gemini without breaking the cut
Asking any AI agent to “trim my video, add subtitles, build graphics, generate B-roll, and mix music” in one giant prompt makes it hard to tell whether a bad moment came from a clipped consonant, a mistimed graphic, or loud music. Professional editors split every project into two passes, and Gemini works far more reliably when you direct it the same way:
- Pass 1 (A-Roll, Steps 2 to 5): Shape the spoken spine. Import the camera roll, cut failed takes and verbal stumbles from the transcript, style captions inside a clean visual safe zone, and add subtle punch-in zooms and transitions so the dialogue flows on its own.
- Pass 2 (B-Roll and delivery, Steps 6 to 9): Reinforce what the speaker says. Add an animated opener, a floating callout card in negative space, a studio-matched B-roll cutaway, a reference-guided YouTube thumbnail, auto-ducked background music, and an outro voiceover before exporting.
How to edit video with Gemini in Antigravity and ChatCut
Steps 1 to 5 lock the A-Roll. Steps 6 to 9 add B-Roll, audio polish, and final delivery.
1. Connect ChatCut Desktop to Google Antigravity
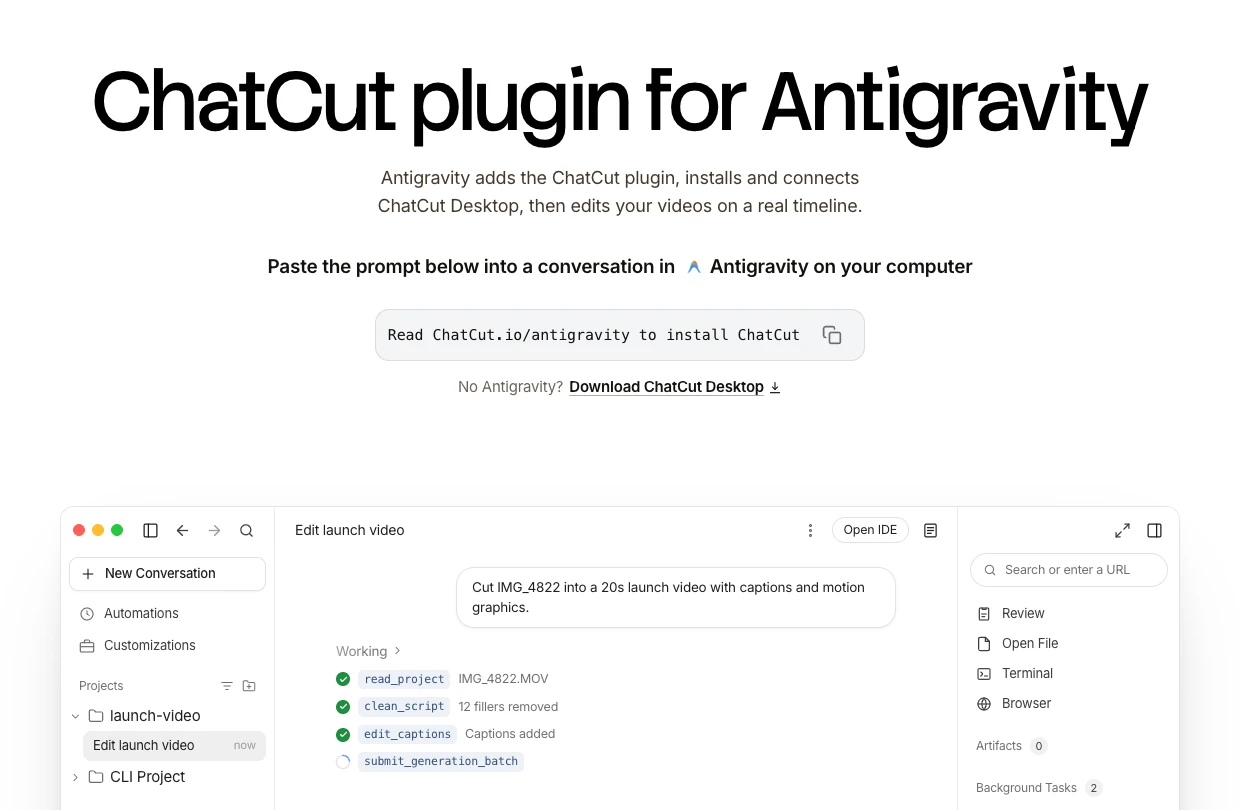
ChatCut installs into Antigravity from a single prompt at ChatCut.io/antigravity, with no manual JSON editing or git cloning required. Open a conversation in Google Antigravity and send:
Antigravity installs the chatcut-desktop plugin, downloads or connects ChatCut Desktop, registers the local MCP server and workflow Skills under ~/.gemini/config/, and prompts you to start a fresh conversation.
Sign in when ChatCut Desktop opens, then start a new conversation so Antigravity loads the connected tools (we confirmed our setup with agy plugin list --json and agy mcp list before starting). If you want the full surface-by-surface verification table for the App, IDE, and CLI, see how to edit video with Antigravity.
2. Import the raw camera roll and inspect the transcript
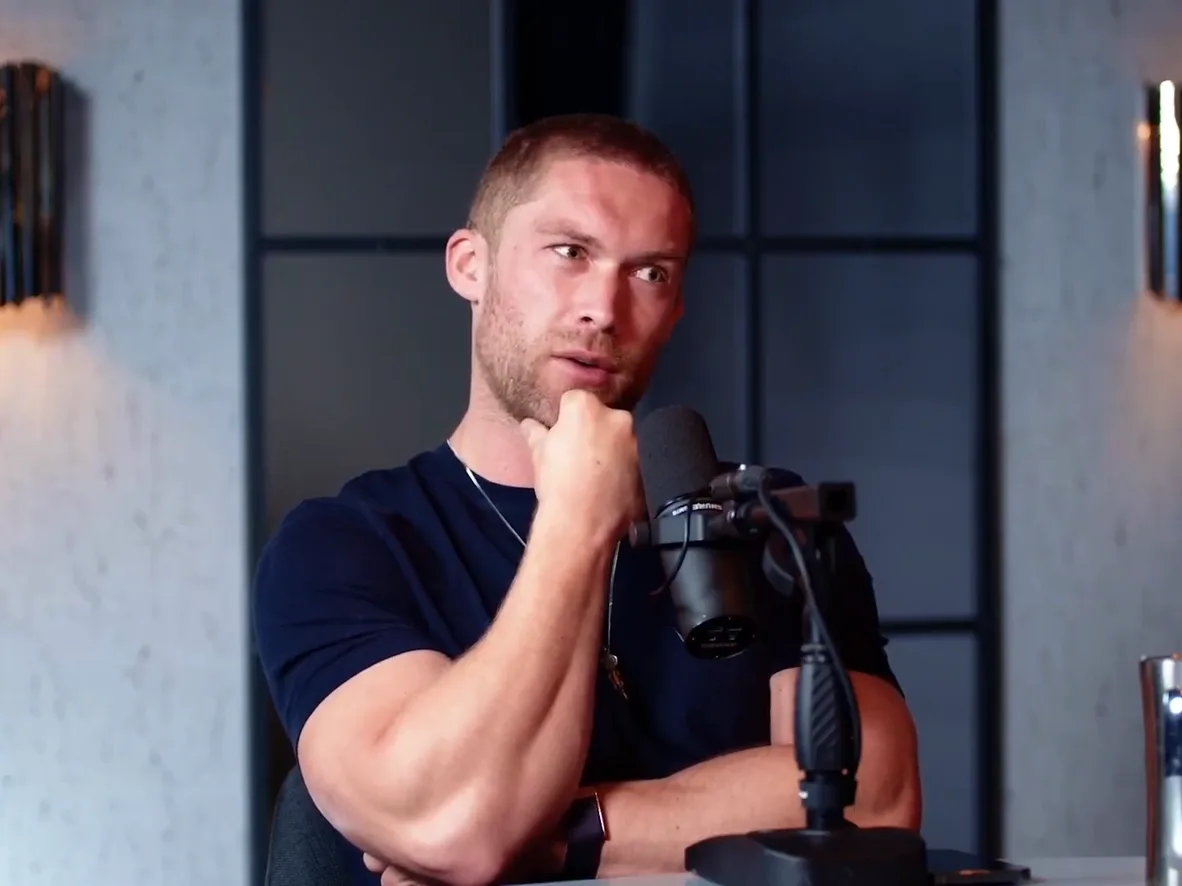
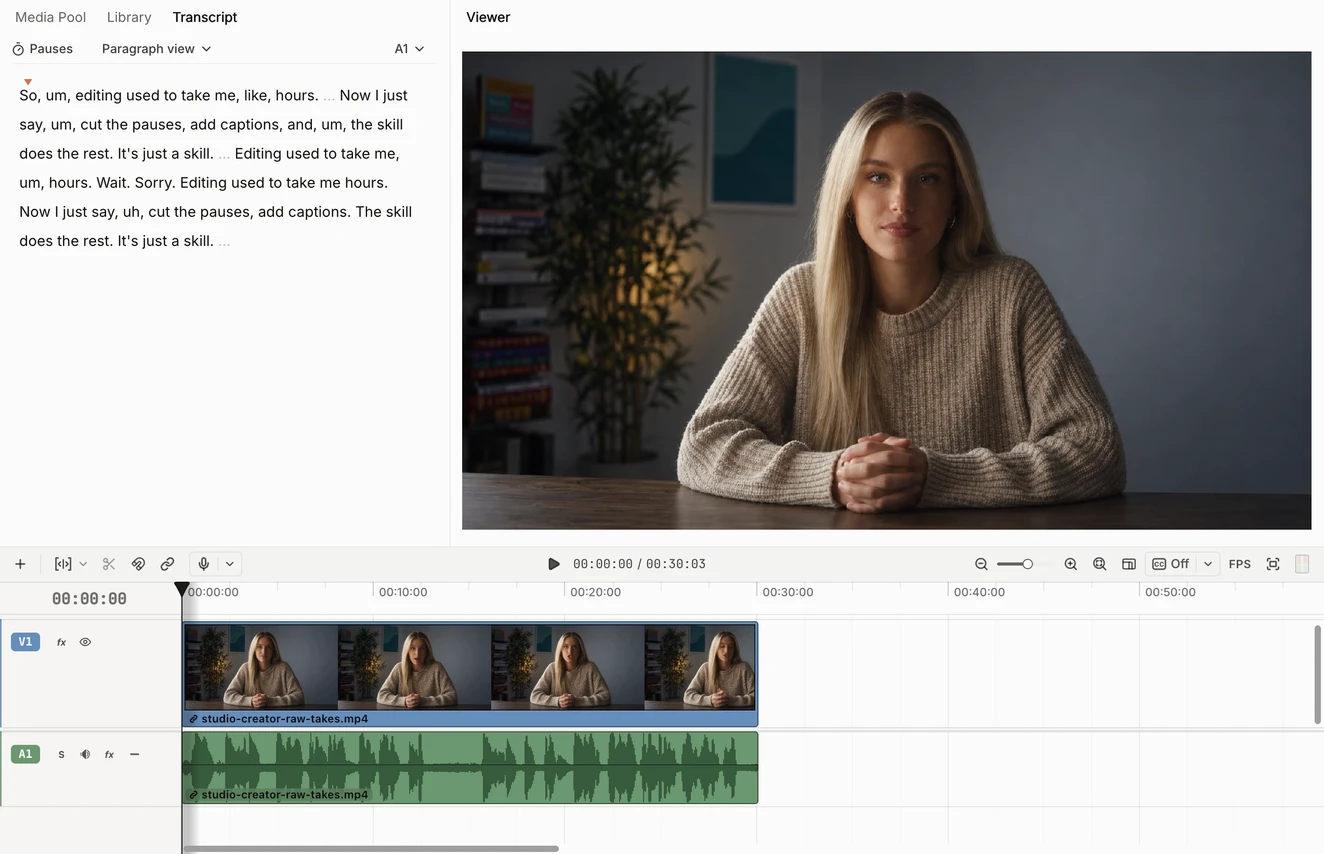
Our source file (studio-creator-raw-takes.mp4, 30.1 seconds, 1920×1080 at 24 fps) was shot in a dual-tone creator studio: warm tungsten key light and plant bokeh on camera left balanced against a cool slate-blue wall on camera right, with a dark walnut desk across the lower frame. Like real creator camera rolls, it contained two takes back to back, filler words, an audible apology, and pauses between clauses.
ChatCut imports the 30.1-second studio clip, completes cloud speech transcription in five seconds at 0 credits, and maps every spoken word and pause onto the Transcript panel.
Reading the word-timed transcript exposed the exact structure of the recording right away:
- 0.28s to 13.38s (Take 1 + false start): “So, um, editing used to take me, like, four hours… Wait. Sorry.” followed by a 1.74-second reset pause.
- 15.12s to 20.29s (abandoned restart): A partial second attempt before the speaker settled into her cleanest delivery.
- 20.29s to 29.04s (keeper take): Confident delivery marred only by an “uh,” hesitation in the middle and a rapid self-correction near the end.
3. Build the rough cut: drop retakes, false starts, fillers, and pauses
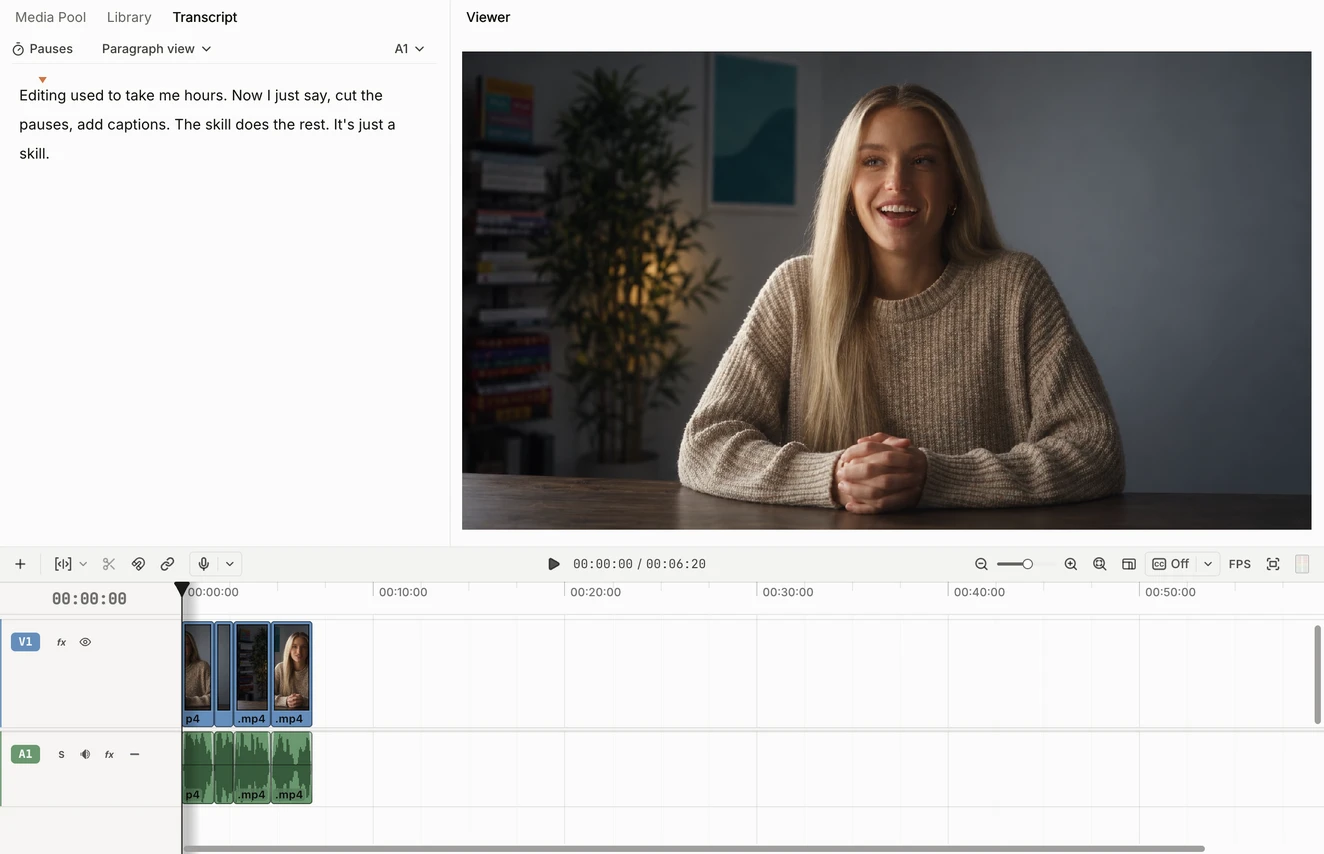
With the transcript mapped to the timeline, we asked Gemini to cut everything except the strongest take, tighten pauses over 0.35 seconds down to a natural 0.20-second breath, and apply short audio fades across every cut (transcript editing guide).
Gemini edits the timeline script, trims a hidden mid-sentence stumble caught during the audio check, and condenses 30.1 seconds down to 6.8 seconds across four clean clips.
Having Gemini render and check the rough-cut audio exposed a classic real-world catch that transcript-only editors miss: the speech recognizer had collapsed a fast verbal stumble (“The skill does the— the skill does the rest”) into a single word token. Listening to the rendered mix caught the extra half-phrase immediately, and Gemini trimmed the fourth clip’s in-point forward by 17 frames and shaved one boundary frame around “uh,” so both the audio and the Transcript panel read cleanly: “Editing used to take me hours. Now I just say, cut the pauses, add captions. The skill does the rest. It’s just a skill.”
4. Style word-level captions for the studio frame
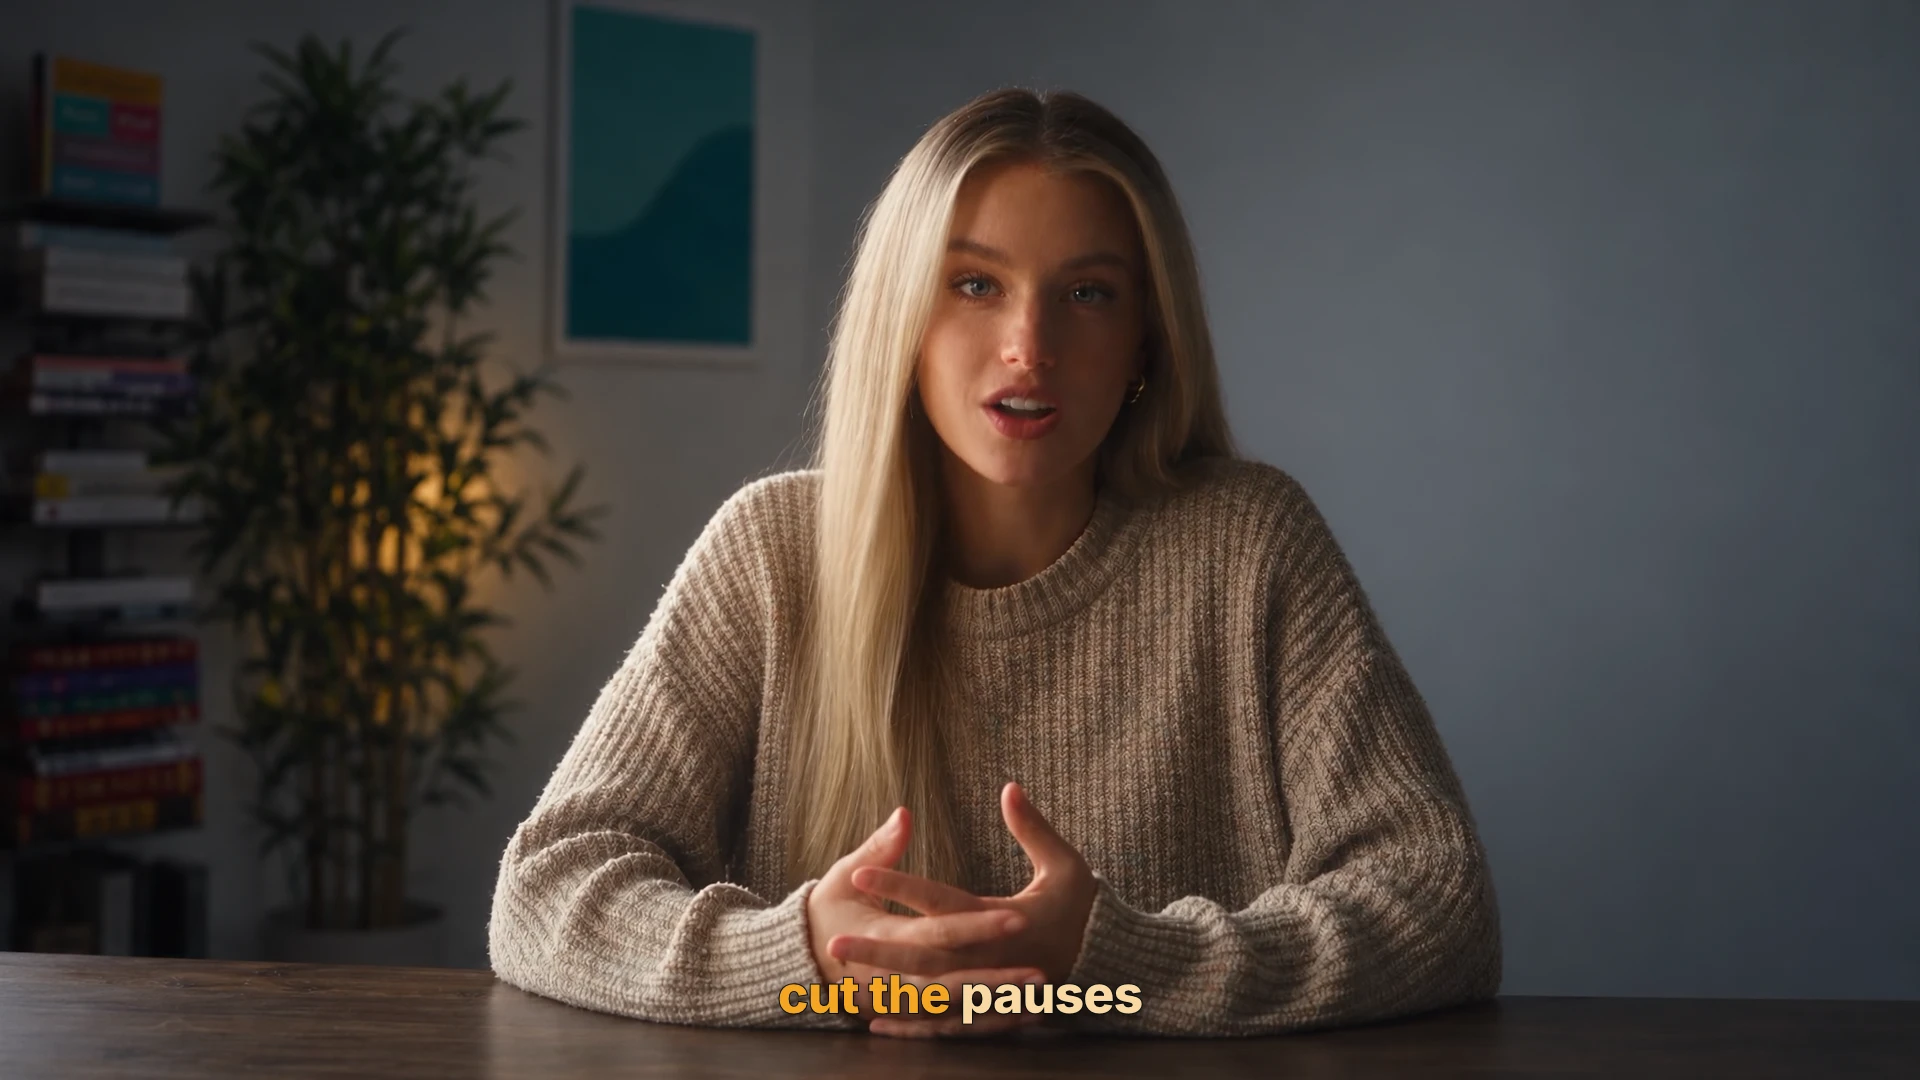
Once the spoken timing is locked, captions inherit every cut automatically (adding captions). Instead of dropping a generic neon preset on top of studio footage, we matched the caption palette to the room’s lighting and checked rendered frames to make sure the text stayed clear of the speaker’s hands.
Gemini applies the custom caption style, inspects the rendered frame, and lowers the caption baseline into the dark walnut desk band below her hands so the text sits cleanly without touching her fingers.
Checking the actual rendered frame paid off right away: ChatCut’s default lower-third height grazed the speaker’s fingers, whereas anchoring the baseline inside the dark wood desk band gave the white-and-amber words effortless contrast without covering her performance.
5. Hide jump cuts with a punch-in zoom, dissolve, and sound effect
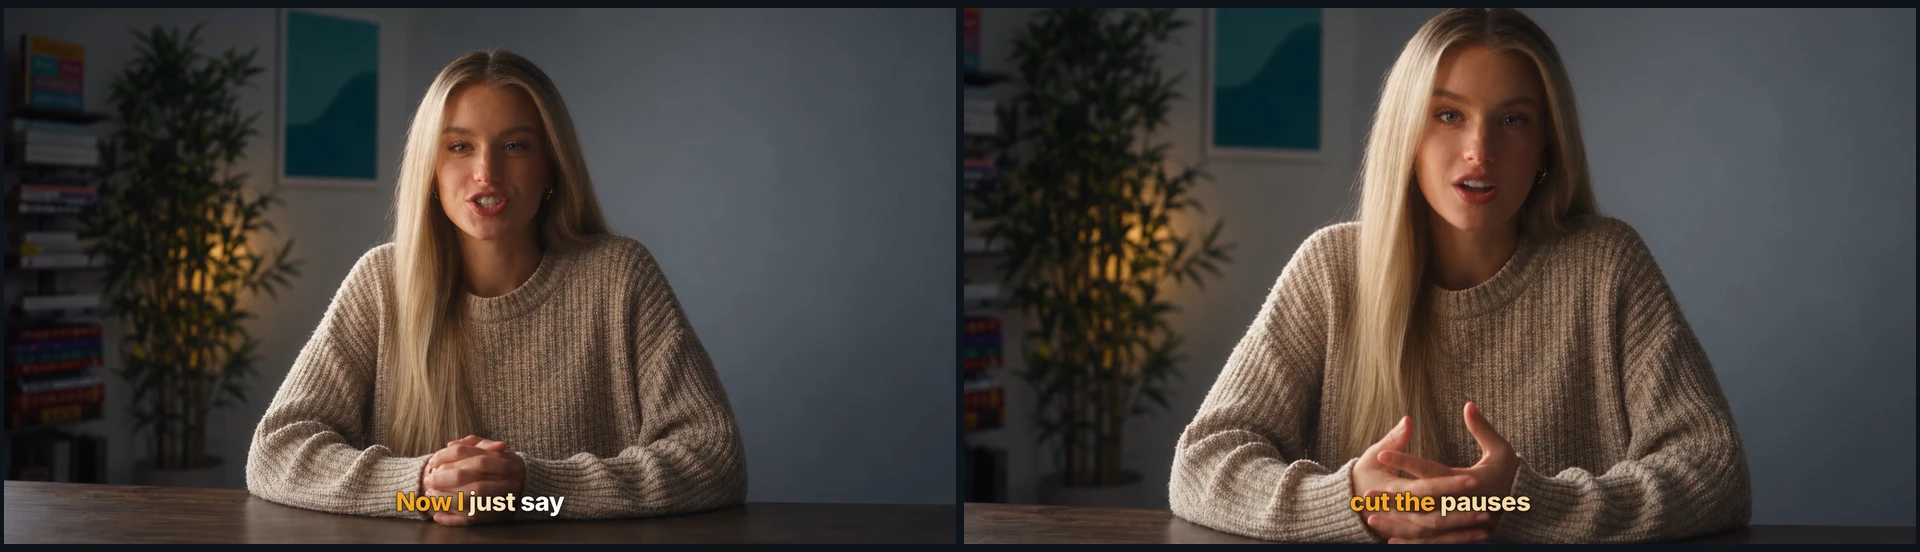
Removing the “uh,” filler between “add captions” and “the skill does the rest” left a slight jump in head position on a locked-off tripod shot. The cleanest editorial fix is reframing the incoming clip ~15 percent tighter centered on the speaker’s eye line so the cut reads like a deliberate second camera angle, paired with a subtle whoosh and a 4-frame dissolve on the earlier clause break.
Gemini attaches native zoom effects to Clips 1 and 3, adds a 4-frame dissolve, and places Airy Short Whoosh on A2 at -16 dB.
6. Build editable Motion Graphics for the opener, callout, and end card
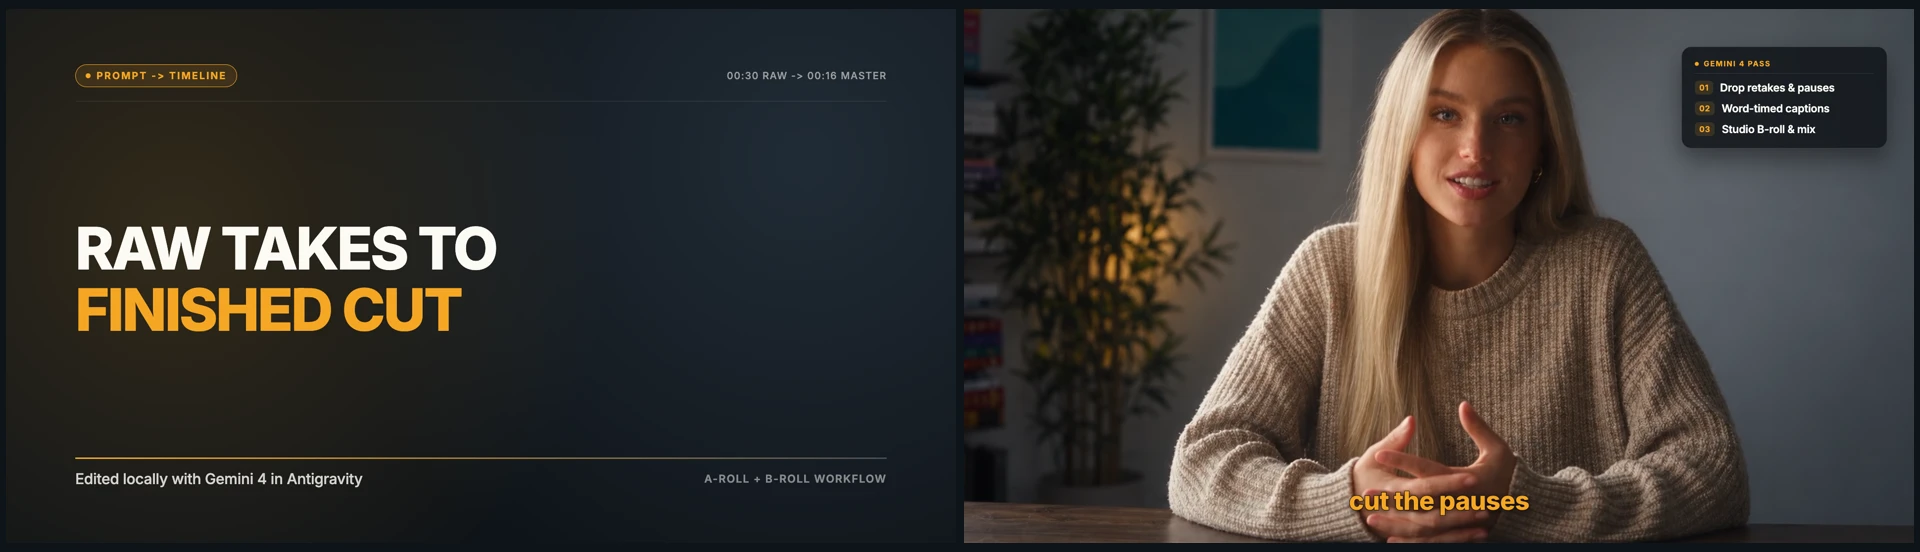
With the A-Roll complete, we moved to Pass 2 (B-Roll). In ChatCut Desktop, Gemini writes real React/Remotion components (Motion Graphics guide) that stay live and editable on the timeline, so you or the agent can change headlines, colors, or step labels without re-rendering flat video files. Notice how our speaker sits slightly right of center on the wide shot and leaves clean slate-blue wall space in the upper-right corner: that negative space is ideal for a floating glass callout card.
Gemini writes three frame-rate-independent Remotion components, places the opener and end card on V1 and the floating callout on V2, updates the callout eyebrow to 'GEMINI 4 PASS', and widens the end-card subline so every sentence stays on a single clean line.
7. Generate a studio-matched B-Roll cutaway and YouTube thumbnail
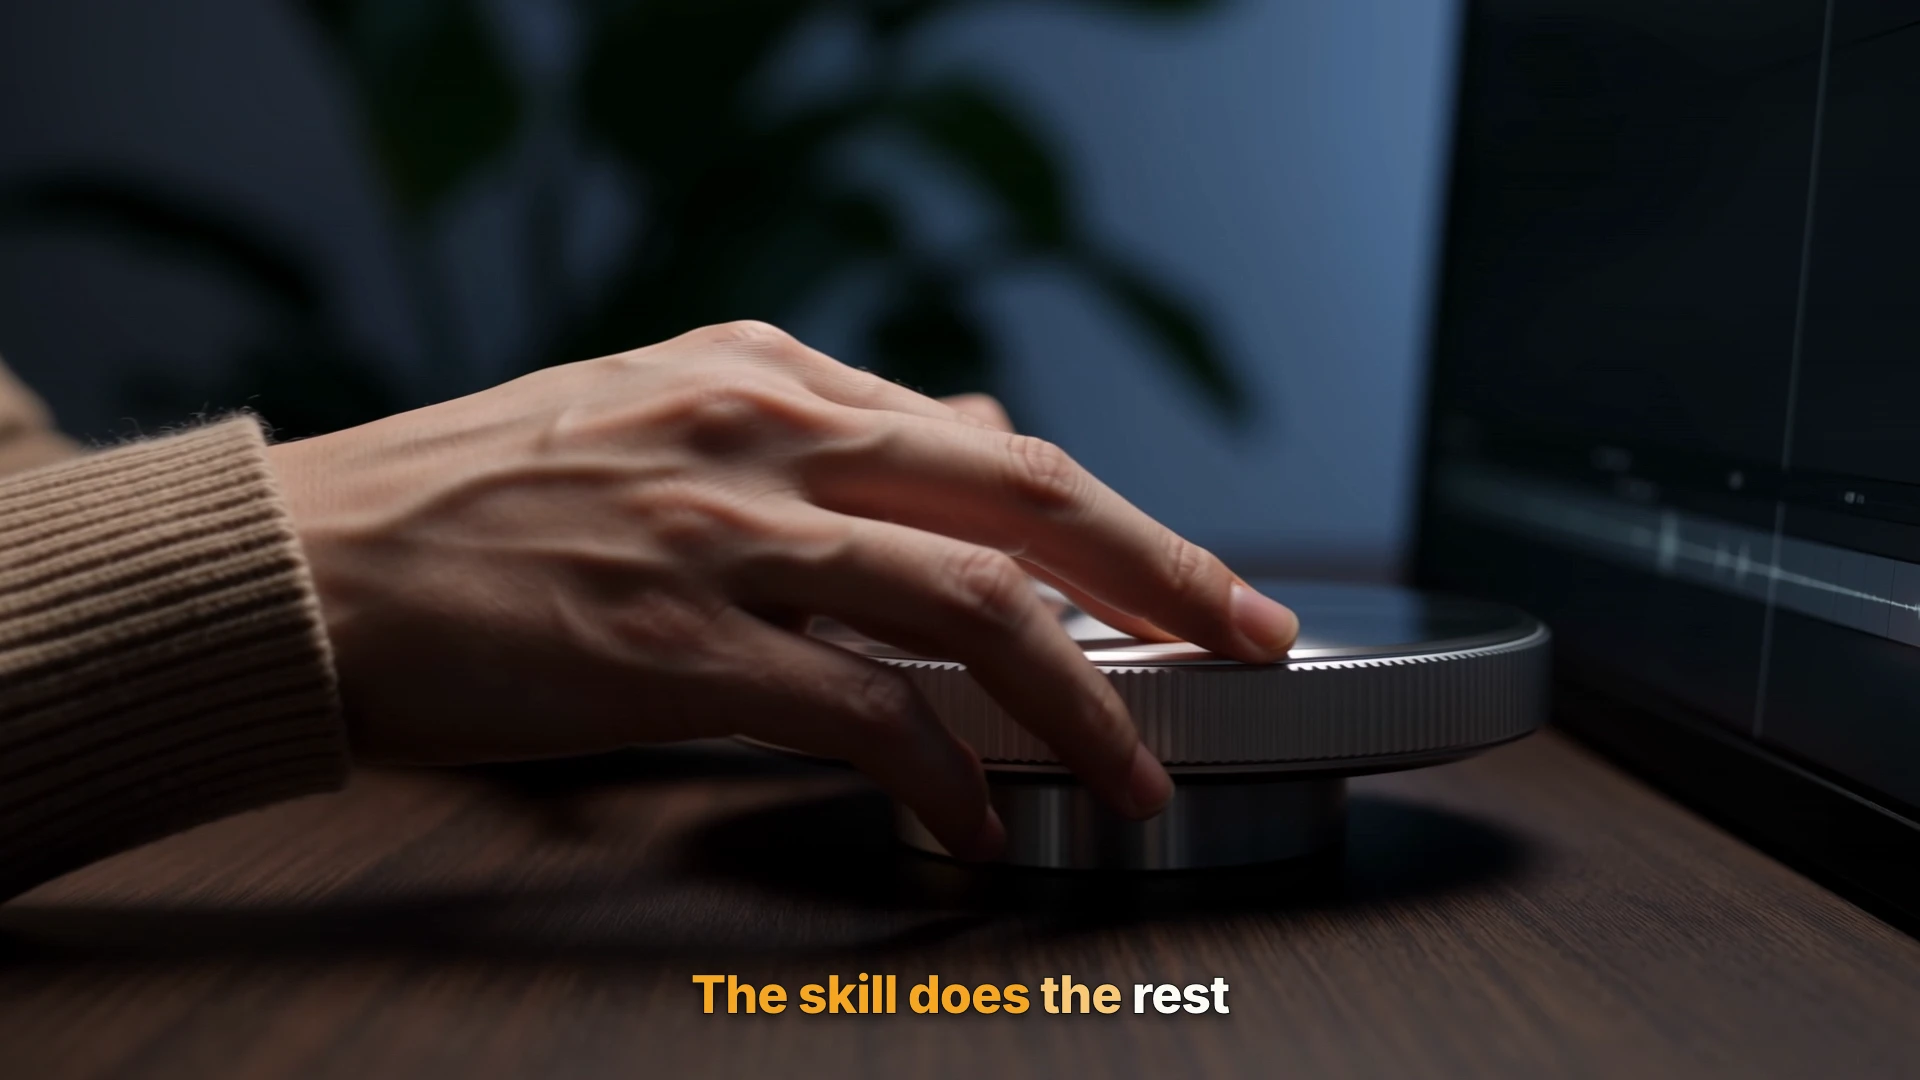
When a talking-head video mentions a workflow action (“The skill does the rest”), cutting away for 1.5 seconds to hands on hardware gives the edit tactile pacing, even if you never filmed B-roll on shoot day. We used two hosted models inside ChatCut for this step, checking credit estimates first:
- B-Roll cutaway (Kling 4.0, 5 seconds at 1080p, 5.64 credits): We prompted a macro over-the-shoulder shot matching our speaker’s exact oatmeal ribbed knit sweater cuff, dark walnut desk, warm tungsten key light, cool slate-blue background with indoor plant bokeh, and a brushed-aluminum editing jog wheel beside a dark timeline monitor. Gemini inspected four decoded frames across the 5-second clip to verify natural hand motion and placed 1.4 seconds of video-only picture onto V2 over “The skill does the rest”, cutting back to her smiling expression on “It’s just a skill.”
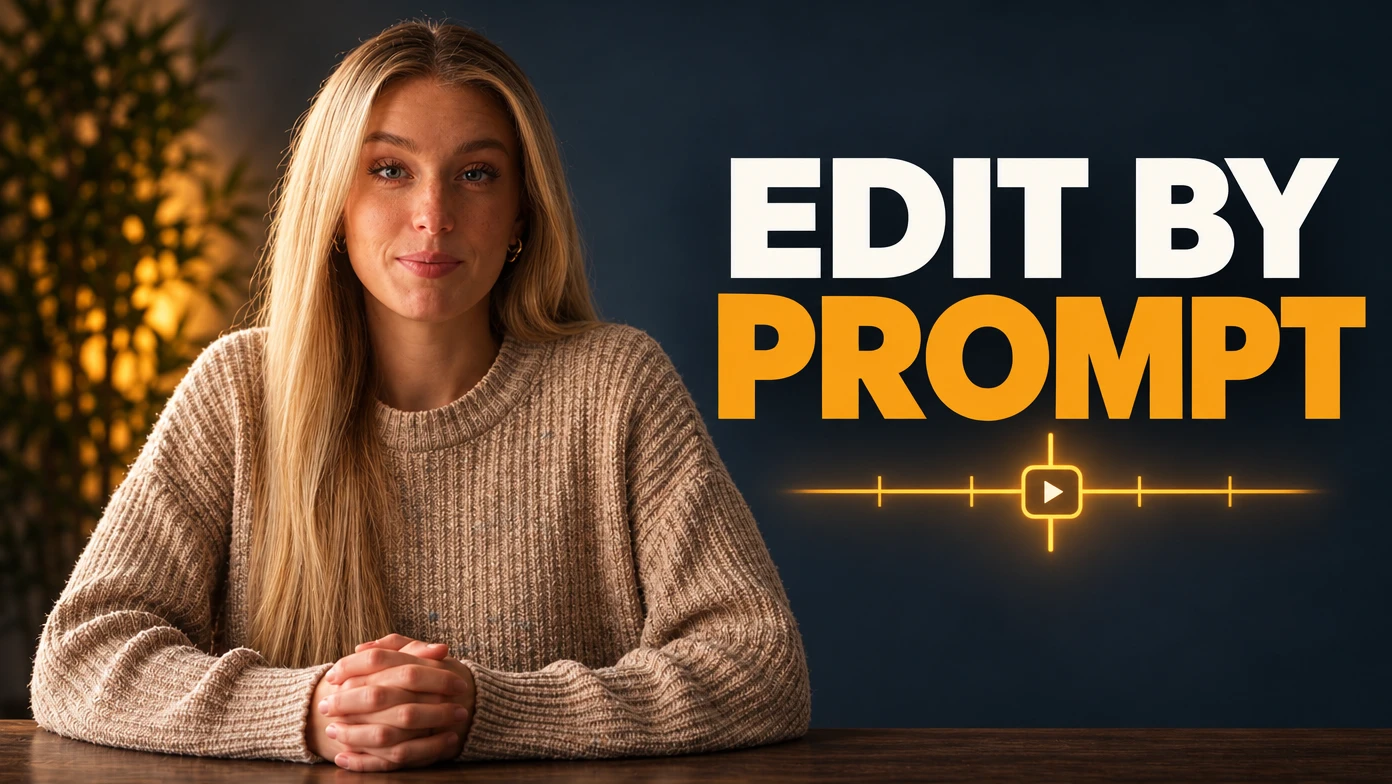
- Reference-guided YouTube thumbnail (GPT Image 2.6 Flare, 16:9 high quality, 0.21 credits): Gemini passed frame 80 from the live timeline directly as a visual reference so the thumbnail kept the exact same creator, sweater, desk, and warm plant bokeh while composing stacked EDIT BY PROMPT display type on the clean right half of the frame.
Kling 4.0 renders the 1080p cutaway (5.64 credits) and GPT Image 2.6 Flare generates the reference-matched thumbnail (0.21 credits). Gemini verifies both assets visually and places the cutaway cleanly onto V2.
8. Layer auto-ducked background music and an AI voiceover outro
To carry energy from the kinetic opener through the studio cut and into the end card, we generated an instrumental Rhodes electric-piano and brushed-snare groove (0.22 credits) plus a calm 5.5-second AI voiceover for the end card (0.08 credits), then enabled track-level audio ducking so the music automatically dips by 7 dB whenever dialogue (A1) or voiceover (A2) speaks.
Gemini generates the instrumental bed (0.22 credits) and voiceover (0.08 credits), spaces the outro voiceover 0.60 seconds after the A-Roll ends so the Rhodes chord breathes, enables automatic track ducking, and verifies -16.8 LUFS integrated loudness with -3.1 dBFS peak.
Listening back to the rendered mix caught a subtle timing detail worth copying: starting the outro voiceover 0.35 seconds after the on-camera speaker felt slightly rushed, whereas nudging it out to 0.60 seconds let the warm electric piano swell briefly on the end-card entrance before the narrator spoke. Both vocal tracks measured within 0.2 dB of each other (-19.7 dBFS dialogue vs. -19.9 dBFS voiceover).
9. Review the timeline and export MP4 or Premiere XML
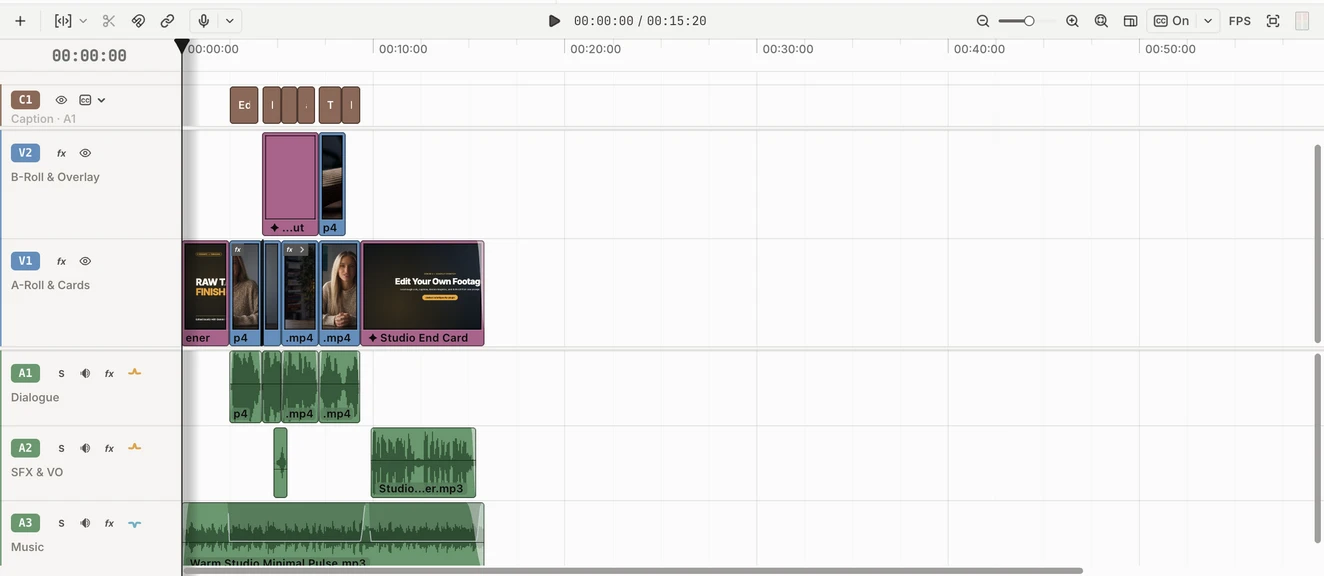
Before exporting, inspect the start, major cuts, caption line breaks, Motion Graphic text, and final audio fadeout. When the timeline checks out, ask Gemini to render a local H.264 MP4 (local export guide), or export an FCP7 XMEML file (XML export guide) if a colorist or sound mixer wants to continue in Adobe Premiere Pro or DaVinci Resolve.
ChatCut Desktop renders the 15.8-second 1080p H.264 + 48 kHz AAC master locally on disk and writes a valid 24 fps XMEML sequence file at 0 ChatCut credits.
What Gemini actually called under the hood
Across Steps 1 through 9, Gemini 4 Carbon orchestrated ChatCut Desktop’s local MCP tools in sequence: target_project and manage_timelines to set up the 24 fps workspace; push_asset and read_script to import the camera roll and inspect word-timed pauses; apply_script and smooth_audio to execute the rough cut and 4-frame dialogue fades; edit_captions to style and position the word-highlighted subtitles; edit_item and edit_asset to attach native zooms, dissolves, sound effects, and live Remotion .tsx Motion Graphics; estimate_generation, submit_video, submit_image, submit_music, submit_voice, and track_progress to quote and collect the optional cloud assets; edit_track to wire anchor/follower audio ducking; preview_timeline, inspect_asset, and inspect_app to audit rendered frames and mix loudness; and export plus read_billing to deliver the MP4/XML files and reconcile the credit ledger (6.15 credits for the main cut’s four cloud assets, plus 4.92 credits for the two Gemini Omni passes below = 11.07 credits total).
When to use Gemini Omni 1.1 Flash instead: restyling a single shot
Timeline editing preserves your exact camera pixels. What if you have a well-shot 5-second fashion or product B-roll clip and want to test a new wardrobe color, material, or lighting mood without booking a reshoot? That shot-level transformation is where Gemini Omni 1.1 Flash (video generation models) excels.
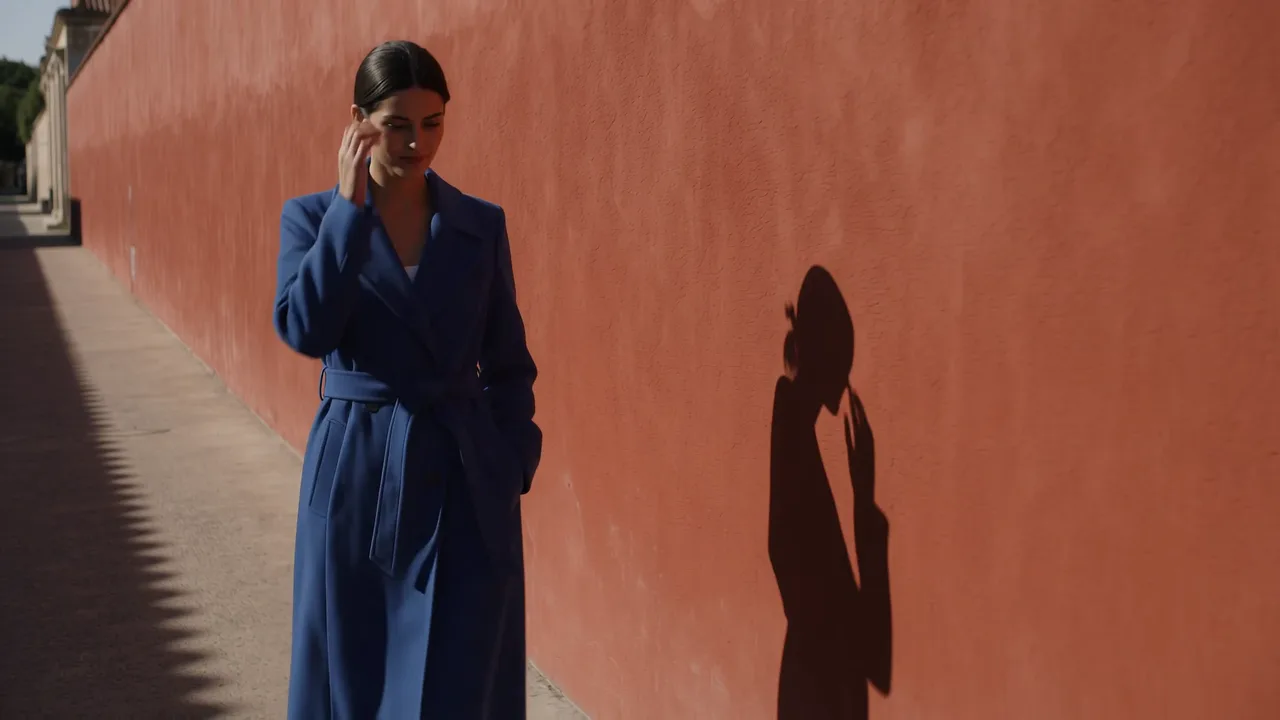
We tested Gemini Omni 1.1 Flash in Edit mode on a 5-second 1080p (24 fps) sunlit Mediterranean fashion clip: a woman walking past a textured terracotta plaster wall in a flowing off-white linen trench coat while tucking a strand of hair behind her ear.
Just as with timeline prompts, the secret to a clean generative shot edit is explicitly locking what must not drift. Because ChatCut lets you run Gemini Omni 1.1 Flash at 360p before paying for 1080p, we ran a two-step preview-then-final pass:
The 360p preview settles at 1.04 credits and confirms her stride, ear-tuck gesture, and wall shadow stay intact. The subsequent 1080p pass settles at 3.88 credits with sharp wool texture and stitched cobalt lapels.
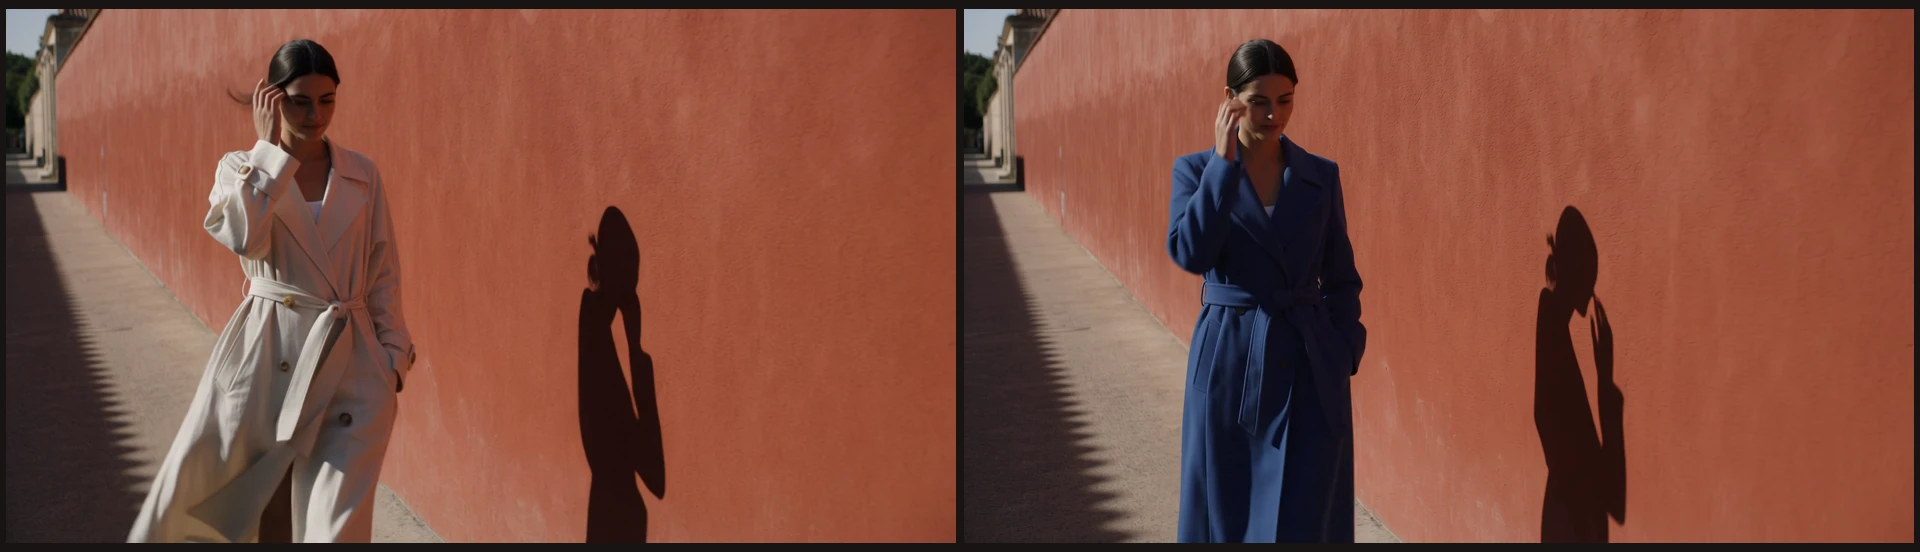
Two practical lessons stood out from inspecting the decoded frames at 0.2s, 1.8s, 3.3s, and 4.8s:
- Test prompts at 360p (1.04 credits) before committing to 1080p (3.88 credits). If a prompt accidentally alters the background wall or skin tone, catching it at 360p costs roughly a quarter of a Full HD pass.
- Remember that 360p and 1080p are independent generations. Unlike draft-to-final promotion on Seedance 2.5, Gemini Omni 1.1 Flash generates a fresh pass from your source video when you switch to 1080p rather than upscaling the 360p preview. In our run, the 1080p pass actually produced a cleaner hair bun silhouette at 4.8 seconds alongside visible brushed-wool weave, while preserving the same stride and shadow timing. For a broader breakdown of editing vs. generating pixels, see AI video editor vs. AI video generator.
Copyable Gemini video editing prompts for common workflows
Copy any of these briefs into Google Antigravity once ChatCut Desktop is connected, then review and refine one layer at a time.
1. Talking-head or video podcast cleanup
2. Long interview to 9:16 YouTube Shorts, Reels, and TikToks
3. Product walkthrough or SaaS launch promo
What you still need to check yourself
Even with Gemini inspecting rendered frames and loudness meters, four human checks belong at the end of every session:
- Fast self-corrections in speech. Speech-to-text models occasionally merge a rapid verbal stumble into the start of the next word. Always play the rendered rough cut by ear (or ask Gemini to render and audit the audio track) before styling B-roll on top.
- Caption safe zones against hands and props. Default lower-third heights work on tight chest-up shots and collide with gesturing hands on desk shots. Inspect at least two captioned frames before exporting.
- Subtle pixel differences on Gemini Omni shots. Because Gemini Omni regenerates the entire frame, avoid running it on shots containing UI text, brand logos, or legal disclaimers that must stay pixel-exact; keep those shots on the native timeline instead.
- Music release tails between speakers. When transitioning from on-camera dialogue to an end-card voiceover, leave 0.5 to 0.7 seconds of breathing room so auto-ducked music doesn’t pump abruptly between voices.
Troubleshooting Gemini video editing in Antigravity
ChatCut tools do not appear inside Antigravity
Antigravity loads MCP servers when a conversation starts. First, confirm you installed via Read ChatCut.io/antigravity to install ChatCut (installing the repository root directly registers a gemini-cli extension with zero workflow Skills instead of the antigravity-desktop plugin). Second, if Antigravity reports that the Desktop launcher was not found right after install, open ChatCut Desktop manually once and sign in. Third, if a fresh conversation still lacks ChatCut tools, open Customizations → Installed MCP Servers, refresh chatcut_desktop, and click New Conversation (running agy mcp list in a terminal should show chatcut_desktop enabled over stdio).
Gemini App says video upload is unsupported in your region
Google restricts uploading videos for generative editing in Gemini Apps across the EEA, Switzerland, the UK, and select US states. Local timeline editing through Antigravity + ChatCut Desktop runs directly on your Mac or Windows PC and does not depend on Gemini Apps’ web upload toggle (provided Google Antigravity itself is available for your account and location).
Imported XML looks different in Premiere Pro or DaVinci Resolve
Standard cuts, multi-track audio placement, and linear speed changes carry cleanly through FCP7 XMEML (exporting XML). Custom Remotion Motion Graphics and native ChatCut caption styles do not translate natively as editable Premiere text layers; enable Include motion graphics on Pro to render transparent ProRes 4444 overlays beside the XML, or export your final captioned MP4 directly from ChatCut Desktop.